Wednesday, March 30, 2011
Panda Cuff Pattern

Here is another chart for a cuff bracelet. It measure 2.35" by 7.50" done in 11/o delica beads.
You can shorten or lengthen by adding or deleting rows from the ends. Pattern was created on BeadCreatorPro. Enjoy!
Saturday, March 26, 2011
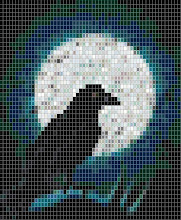
Viola Chart
 Here's a chart done in peyote stitch. This measures 6.5" by 2". If you need it longer, just add a few rows on each end in the background color. I also made it in brick stitch and two drop peyote. If you want to see them, just let me know.
Think Spring! Maybe we can WILL it to come!
Night Out
Well, I should say late afternoon out. We don't go out at night much anymore.
We left home around 3 and went to Stroudsburg. Stopped at Borders Bookstore
and I bought 3 beading magazines, Wirework, Bead and Button and Beadstyle.
Then on to the Pocono Cheesecake Factory, http://www.poconocheesecake.com/products.html. Oh, cheesecake to die for. Bought a quarter
with cherry topping. We bought this to take home for desert first, because the store
would have been closed by the time we finished dinner at
Smugglers Cove, http://www.smugglerscove.net/tour.html. If you visit the Poconos, be sure to stop there. Our dinner was
fabulous. Icy cold beer and shrimp cocktail to start. Gary had gumbo and I had a salad
next, with warm bread. Then we each had 1/2 a large Maine lobster and steak (ribeye for me and NY strip for hubby), fries, and broccoli. We were so full, they practically had to roll us
out the door - lol. Home by 6:30 and I fell asleep within a hour - which is why I am up
so darn early this morning.
OH, and as we left The Smugglers Cove, I notice a BEAD shop along the way! A bead shop I haven't been to! Now, there's an adventure in the making - lol
Wednesday, March 23, 2011


Tuesday, March 22, 2011
Spring in the Greenhouse
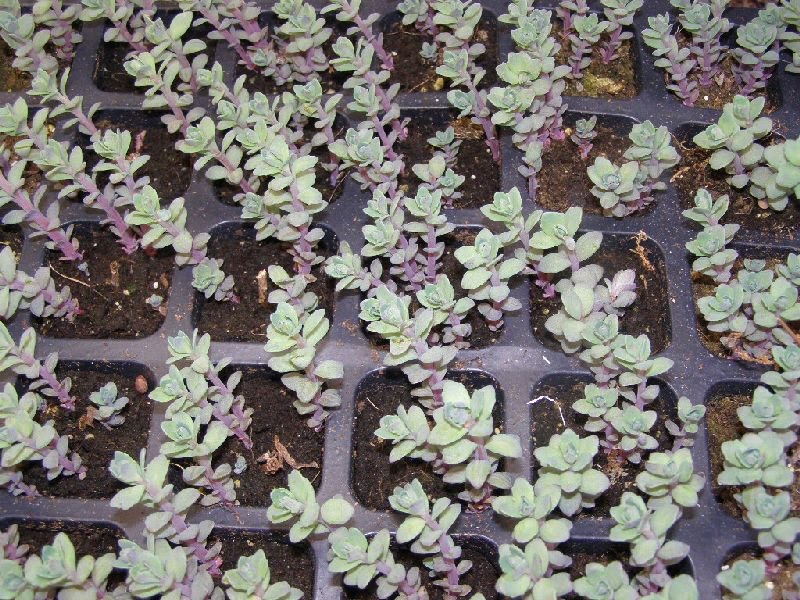


I run plant co-ops through out the spring and summer. A group of us buy plants wholesale by the trays.
All the plants are shipped to me and I divide them up and send them on to their permanent homes.
Usually by the time the plants or bulbs arrive, I can leave them outside and pack them for shipping. BUT, it's still cold outside, snow on the ground and more coming tonight and possibly
later in the week.
I can fit some in the greenhouse, but I already had a lot of hostas overwintering in there, so there
isn't too much space. This week, I'm packing and shipping sedums, aka stonecrop. Hoping to get all these out in the mail before about 1200 lily bulbs arrived, followed by echinacea and heuchera.
Top Row here - Sedum Xenox and Sedum Autumn Charm
2d Row - Sedum Autumn Delight and Chocolate Ball
Spring!

Spring? Yep, this is what greeted us yesterday morning. Almost 4 new inches of snow over night.
That stupid groundhog! Early spring, indeed. Even if he had called for 6 more weeks of winter, he would still be wrong!
Just when the winter's accumulation had almost melted! Little plants were peeking up out of the soil. This won't hurt them though. And neither will the 4-6 " called for tonight. Spring will win out!
'Onion Snow' is a term used here in PA. But regionally, it has different meanings.
Some say, Onion Snow is a wet spring snow that comes after the onions sprout.
Others, call the first (note they say 'first') wet spring snow after St Patrick's day, is the Onion Snow. It's safe to plant onions in the garden. Sure, if you can find the garden under all the snow!
Monday, March 21, 2011
Rivoli - Finishing Up


We'll add one more row to this piece. BUT when you work the second half, do not add this row.
That way, your two sides will zip together. And if you work with a slightly larger stone, you can
just add another row or two to accommodate it. Or leave off a row for a slighter smaller stone.
You can add fringe of petals to embellish.
Saturday, March 19, 2011
Baking Bread

Gary's in the kitchen this morning. It smells wonderful. Coffee is brewed and he just took two loaves of freshly baked bread out of the oven. Crust brushed with butter. Having a slice with the citrus marmalade he made in January. Any wonder he calls me Queenie?
Wednesday, March 16, 2011
Tiger
 This design is 2.5" wide and 4.8" long. If you want to use it as a cuff bracelet, extend the background on each end to meet you sizing needs.
I made this pattern previous but a wider edition for an amulet bag.
This is in loom stitch, but if you'd like to see it in peyote, let me know.
It only takes a press of a key to change it. Pattern created on BeadCreatorPro.

Wednesday, March 9, 2011

Tuesday, March 8, 2011
Rivoli Part 2


Step 8 - Go down through 2 silver beads from previous round and add 1 silver bead and go back up three silver bead, down through the next - repeat around. We are creating a 'point' for the inner star
End round by coming up through 3 silver and 1 matte
Step 9
add 1 silver - pass through silver
add 1 silver - pass through matte
Step 10
pass through next silver - add 1 matte
bring needle and bead up and over the
same silver bead and pass through the silver
bead again and through the next silver bead
Step 11 - add matte bead and bring up and
over again, pass through the silver bead
Repeat Step 9, 10 and 11 around
Here's what we look like at this point
Saturday, March 5, 2011
Rivoli


This one calls for an 18mm rivoli, but I imagine any 18mm stone would work also.
A small circle of ultra suede to back the rivoli. I've been reading lately that the back
coating can be easily scratched and ruin the look of the rivoli.
11/0 delica beads. I'm using the bright silver DBS 41 here and the matte
silver DB 321
Step 1 - thread on 36 beads in this order
2 silver 1 matte silver 2 silver- tie in circle and pass thread through
the first 5 beads threaded on (2 silver, 1 matte, 2 silver, coming out in front of a matte bead)
Step 2 , add 2 silver beads and pass over 1 matte, and pass through 1 silver bead.
Step 3 - Add 1 matte bead, pass through 1 matte,
add 1 matte, pass through 1 silver (step 3A)
Step 4 - repeat Step 2 and 3 around
Step 5 - at end, pass through the first 2 silver beads added in this round
Step 6 - Add a matte bead, pass through a matte bead
Step 7 - add a silver bead, pass through a matte bead,
add a matte bead and go through the next 2 silver beads Step 7A
Wednesday, March 2, 2011
Peyote Tube Bead - WIP & Book Review
 My next project is inspired by Starry Nights on page 54 of the book Bead Tube Jewelry by Nancy Zellers - this book is a 'must have'. It is full of fun projects to make with easy Peyote Bead Tubes. Lots of different charts for peyote patterns. Her Starry Night pattern is a bracelet and calls for 70 silver stars. I couldn't find enough stars in the right sizes, so I'm using the idea of the stars but it will be totally different and a necklace. I don't know if I'll use all the stars pictured here. I have some silver ones and some
Swarovski's crystal stars.
Delica's - I'm using all matte black #310
and galvanized silver #551. If you shop for delica's, you'll see #1831 is supposed to be a non-tarnishing silver, forget it. I purchased 1831 in Nov and they are still in the flip top box and seem to be turning color already, while I've had #551 for at least a year and a half and they are still bright silver.
Peyote Bead Tubes are made by making small strips of peyote stitch, even count is the easiest.
The small pieces are rolled and zipped up into a tube shape. I'll have more details in the next post. The tubes can be made small or large, and short to long in length. Delica beads make the
best tubes because the beads fit so tightly together.
Beaded Bead - Seed Bead Berry - Part 2


When you reach the shoulder at the other end of the bead - the next row will be add 1 bead
- pass through 2 beads, keep tension tight. Step 6
Step 7 - add a bead, pass through 1 bead, add another, continue around, keeping tension tight.
Step 8 - This row will depend on the size bead you are using, add a bead, pass through a bead, continue until you close gap.
Step 9 - Add a bead, pass through two beads, keeping tension tight.
And here are some ways to dress up your beaded bead.
I think next time I would definitely paint the wooden bead first. This weave is more open than peyote with delica's.
Subscribe to:
Posts (Atom)