Ok, so I was taking one more shot for the Herringbone Beaded Bead. Do you see it? Is this guy smiling at me? He's a happy little bead!
Wednesday, February 16, 2011
Bead Table Wednesday
Ok, so I was taking one more shot for the Herringbone Beaded Bead. Do you see it? Is this guy smiling at me? He's a happy little bead!
Tuesday, February 15, 2011
Beaded Bead Tut Part 2
Ok, we should look like this now.
Step 9A - Add 2 black beads and create herringbone stitch, coming down through 1 black bead
Step 10 -Add 2 silver beads and
Step 11 come up through copper bead, create herringbone stitch, passing back down through 2d copper bead.
Step 12 - Add 2 silver beads and come up through black bead, creating herringbone stitch.
Repeat around, remember to come up through 2 black beads at the last round.
Step 13 - You'll note now we have 2 bead in each color. Create herringbone stitch in each color.
Keep tension tight. Repeat herringbone row. It will start to cup now since you are not adding any more increases.
Step 13a- repeating herringbone stitch
Step 14 - as you continue rows, start to gently form it around your bead - I'm using one about 3/4".
Sunday, February 13, 2011
Beaded Bead #1 Tut
Let's start with this one. http://vyolina.skyrock.com/83.html I'm doing this in stripes like her tut, to show the stitches better, but it would look great in a solid color also. Use delica's for this herringbone stitch. Keep tension tight.
Be sure your thread does not twist when making the herring bone stitch, keep the thread straight out of one bead and into the next without twisting. Don't be put off by the number of
steps I have here, I tried to go really slow :)
Step 1 - Thread on 8 black delica's and tie in a circle. Pass needle through the first bead on.
Step 2 - Add 2 black beads and go through the next 2 bead, repeat around, adding 2, passing through 2 - After you add the last 2 and pass through the last 2, pass the needle up through
the 1 bead added in this step.
Step 3 - Add 2 beads and go back down through the next bead (bead #2 in above step). You are
creating herring bone stitches here.
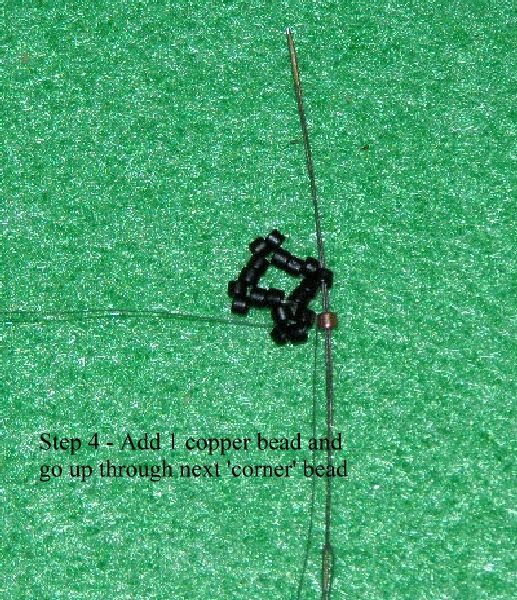
Step 4 - Add 1 copper bead and go up through next 'corner' bead
Step 5 - Repeat Steps 3 and 4 - 3 more times - ending with passing the needle up through the first bead added in Step 3.
Step 6 - Add 2 black beads - and down through only 1 of the black beads in this herringbone stitch.
Step 7 - Add 1 copper bead, pass through the previous copper bead and add another copper bead. Pass needle through the black bead of herringbone stitch. Repeat Steps 6 and 7 around.
Step 7a - come up through 2 black herringbone beads to be in position to start next row
Step 8 - Add 2 black beads and create herringbone stitch. Add 1 Silver bead and go through
1 copper bead, add 2 copper beads and create herringbone stitch coming done through copper
bead, add 1 silver bead and come up through black herring bone stitch. Repeat around ending
with
Step 9 - coming up through 2 black beads in position for the next black herringbone stitch
Beaded Beads
A lot of beaded beads are worked over wooden beads of various shapes and sizes. This keeps the shape of the bead and prevents it from collapsing. You can even use inexpensive round beads or pearls. Michaels, Walmart and other craft stores sell them in
a variety of sizes. Check the woodcraft aisle and the bead area. Besides round beads, look for oval, squares, spools, and even ones that look like fan pulls. Some of the beaded bead designs look better if you paint the the wooden core bead to match the
colors you are using.
Here are some sample beaded beads and I'll do a couple of tut's on them this week. There are so many variations you can do with pattern and colors, no two beaded need look alike!
Saturday, February 12, 2011
Russian Leaf done in St Petersburg Chain Stitch, Part 2
Step 8 After you have made two equal sides and joined them, add enough beads to comfortably run to the bottom two inside contrast beads. The number will vary depending on the size of your leaf and whether you have used delica's or seed beads. This is your main 'vein' in the leaf.
Step 9 and 9a Pass the needle through one contrast bead and out the other and back up the the through 'vein' about 5 or 6 beads
Step 10
Add about 3 beads to make
side vien - go in and out
of inside contrast bead and
back through side vien to
main vein. Step 10A Go through 1
main vein bead and repeat
side vein on other side
of leaf.
Step 11 Repeat Step 10 & 10A
for a few more additional
side veins in the leaf.
Russian Leaves make nice earrings or can be used as components in bracelets or necklaces.
Thursday, February 10, 2011
Russian Leaf done in St Petersburg Chain Stitch, Part 1
Russian Leaf done in St Petersburg Chain Stitch works up better in small to medium sizes so they hold their shape. Delicas or Seed beads work well. We'll be working one side of the leaf at a time.
Step 1 Center stop bead on a yard or so of Fire Line
Add 2 beads main color, 1 bead contrast, 2 beads main color.
Step2 Thread needle back around through all 5 beads exiting up through Bead #5
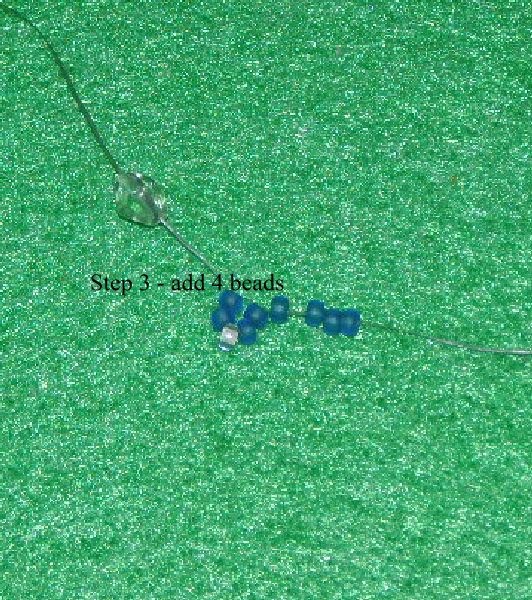
Step 3 Add 4 beads and go back up through beads #1 & 2 of these 4, (see previous post on St Petersburg Chain)
Step 4 - Add your contrast bead and go back down through beads 1&2 & Bead #5
Step 5 - Add contrast bead and go up through Bead #3 and 4. (see my previous post
on St Petersburg Chain Stitch if you need more help) For this leaf I did about 9 rows
Step 6 - flip work and repeat from Step 3 above for the second side of leaf
Wednesday, February 9, 2011
Bead Table Wednesday
I am still working on the necklace portion of the geode necklace. But these beads arrived today.
The stone in the center is a Dogtooth Amethyst that I purchased in Fla. I won't be using all these colors, but some. I think I want some Swarovski bi cones in two shades of lavender also.
I've got three or four projects in mind, it's just a matter of which one I find the right colors for first.

Back to my geode. I almost have half the necklace strap finished.
Subscribe to:
Posts (Atom)